Zuluhood Webhook Setup: DIY Smart Home Security Guide
If your smart home device or platform supports webhooks, you can enhance its capabilities by improving your home security and alarm response time. Zuluhood's webhook integration allows you to do just that.
Here's what you'll learn in this tutorial:
What Are Webhooks?
What Do Zuluhood Webhooks Add to Your Smart Home?
How to Set Up a Webhook in Zuluhood?
What Security Measures Should You Take?
How to Use Webhooks with popular Smart Home Platforms or Devices?
Home Assistant
HomeKit
Homey
Hubitat
UniFi Protect (Ubiquiti)
What Are Webhooks?
A webhook is a one-way, event-driven request that sends information from your platform to Zuluhood. Here’s how it can be used:
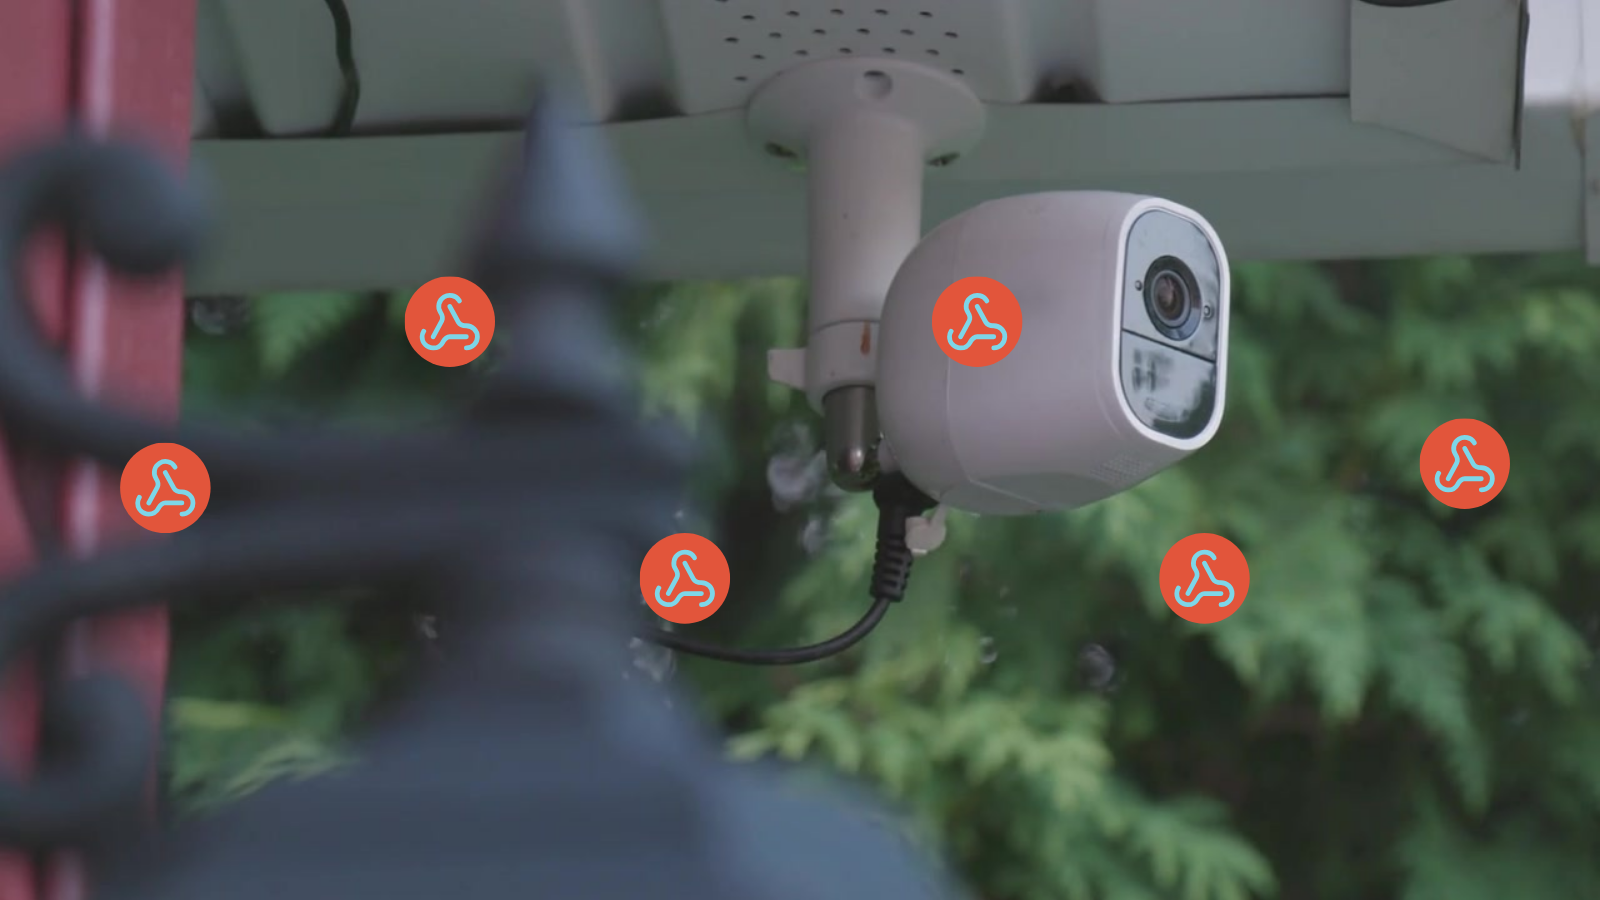
Motion Detected by Your Camera: A webhook notifies your trusted neighbors to check it out.
Window Sensor Alarm: A webhook alerts a professional monitoring company while you are on vacation.
Smart Curtains Jammed: A webhook notifies you and your household of the issue.
What Do Zuluhood Webhooks Add to Your Smart Home?
Zuluhood is designed to improve response to critical home events. It can alert your household, chosen neighbors, or professional security guards you've booked for monitoring via the Zuluhood app.
In short, you don’t have to handle home security on your own anymore.
When an important event occurs—such as motion detected by a camera, water leakage, smoke detection, or a geofencing alert—a Zuluhood webhook automatically triggers the action you've set:
Opens a Home Chat for minor issues, like jammed curtains. You can add messages like "Check the curtains," which will automatically appear in the chat.
Raises an Alarm for more serious alerts, notifying your Home Tribe and selected neighbors or friends. They’ll recognize it as more than just a casual chat.
Alerts Professional Monitoring: If you've activated professional monitoring, any webhook-triggered alarm will be handled by security guards who can assist you or call the police if needed, day or night.
How to Set Up a Webhook in Zuluhood?
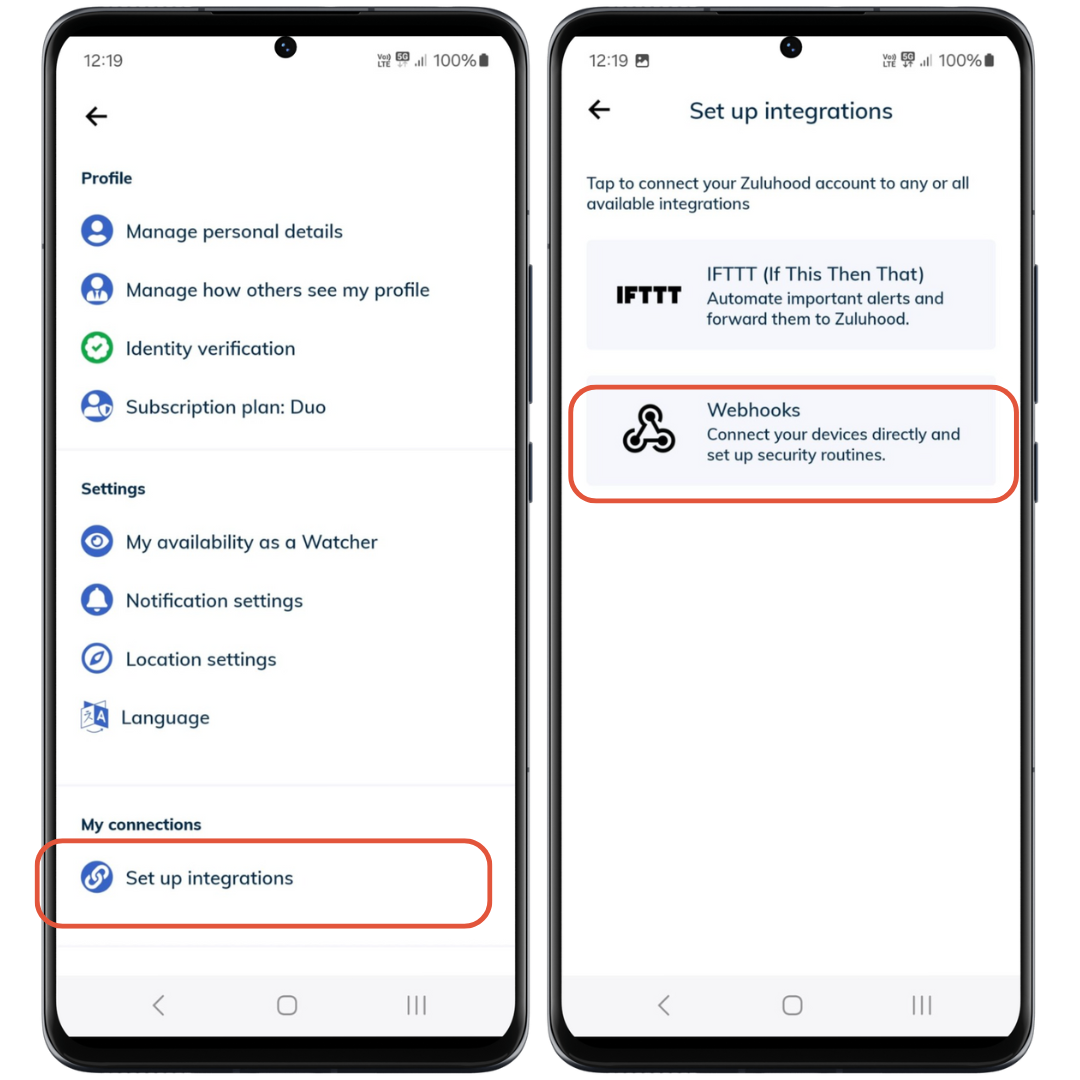
1. Create a Webhook in Zuluhood:
Go to your profile settings
Click on "Setup Integrations."
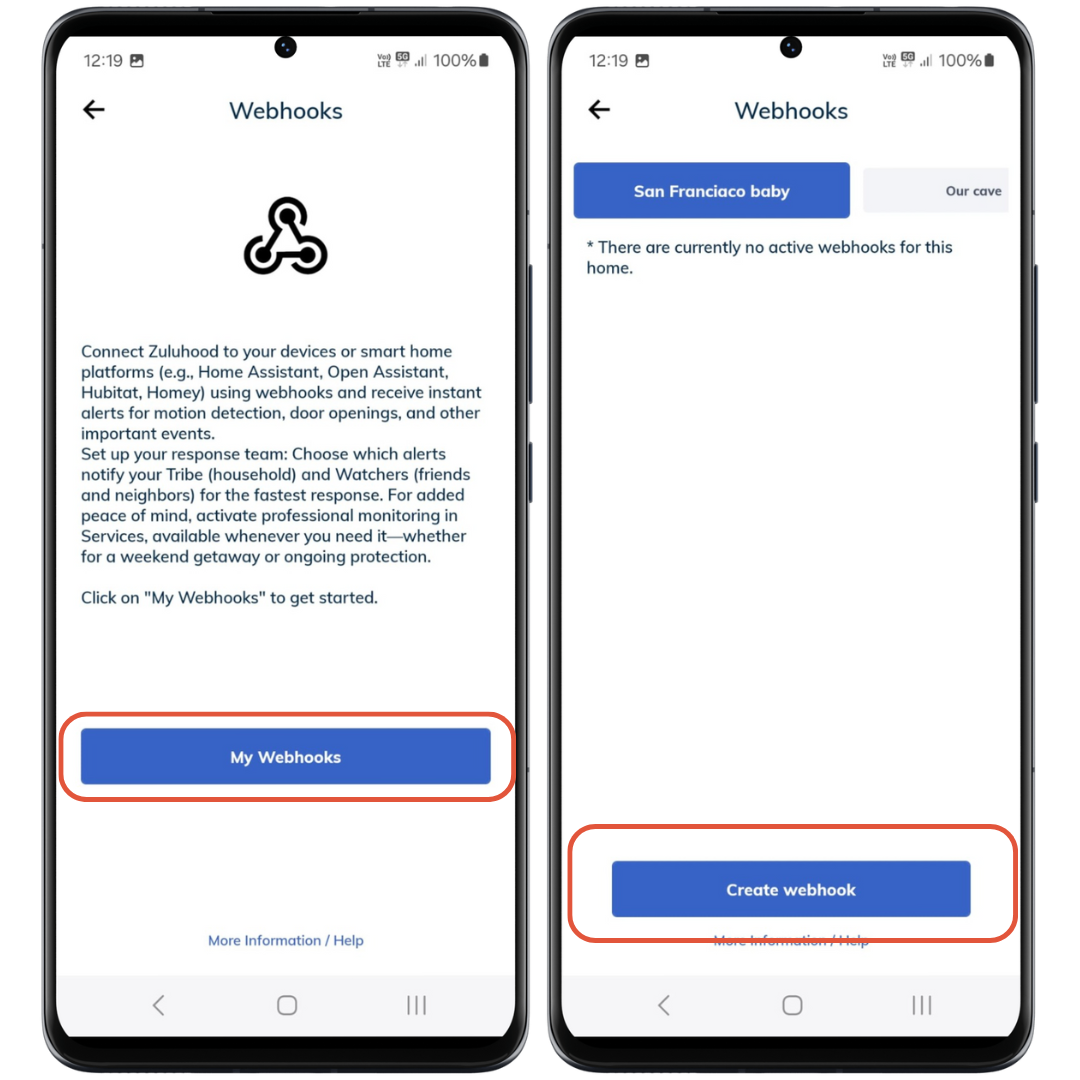
Choose "Webhooks" and select "Create Webhook."
Assign the webhook to a specific home and define the action it will trigger.
Name your webhook and optionally add a message that will appear in the alarm or home chat.
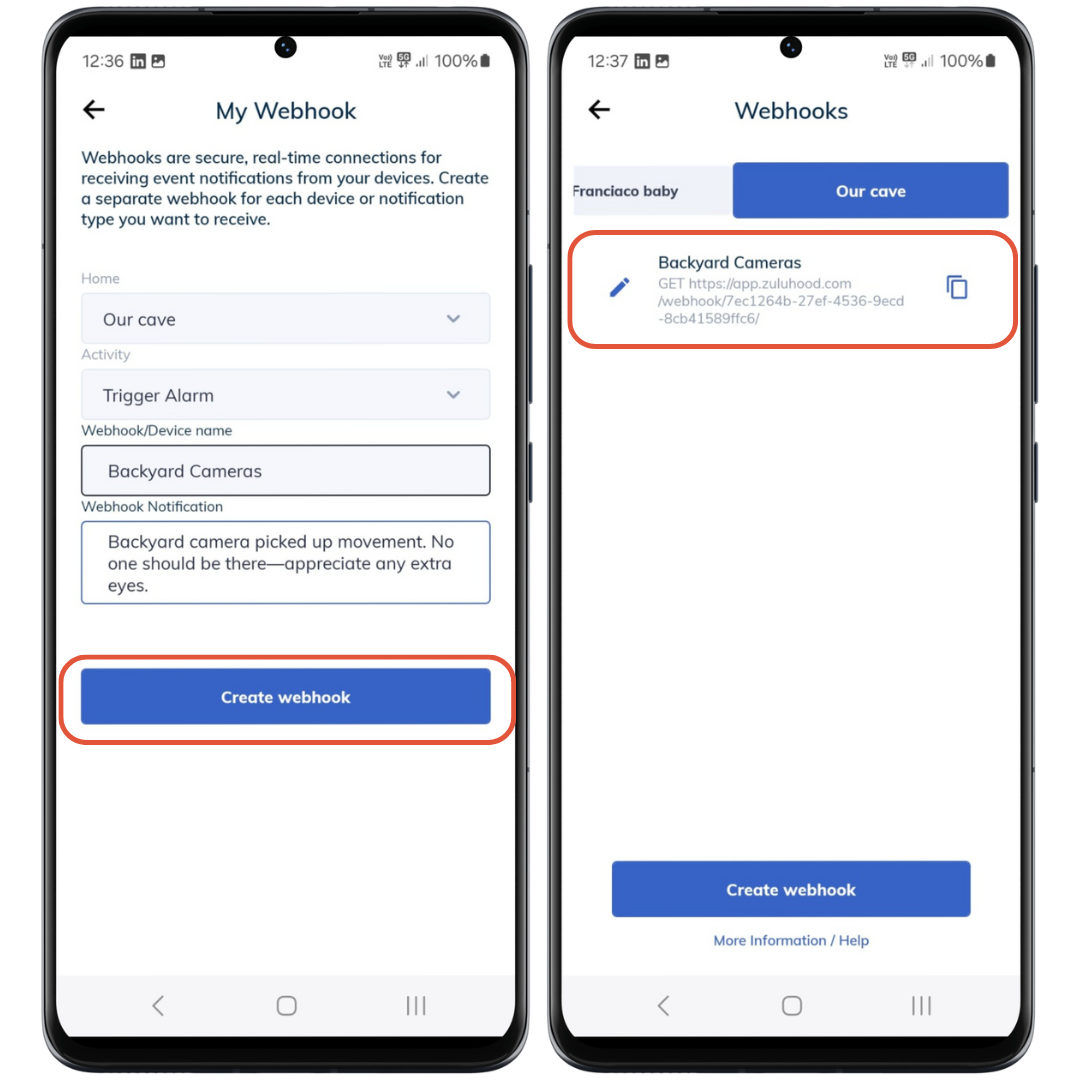
2. Add the Webhook URL to Your Smart Home Device:
Copy the generated webhook URL and paste it into your smart home device or platform as an action. You can define a webhook for a specific event, or use the same webhook for a single device or a group of similar devices. The choice is yours.
What Security Measures Should You Take?
Each Zuluhood webhook is a unique HTTPS link, ensuring secure communication between your device and Zuluhood. However, keep this link private and do not share it.
Remember, Zuluhood webhooks are an additional security measure for your home—not a replacement for professional security services.
How to Use Webhooks with popular Smart Home Platforms or Devices?
You can integrate Zuluhood webhooks with platforms such as Home Assistant, HomeKit, Homey, Hubitat, or NVRs like UniFi Protect. Here is how:
Home Assistant - Setup Guide
Open Home Assistant:
Log in to your Home Assistant interface.
Navigate to Automations:
Go to Configuration in the sidebar.
Click on Automations & Scenes.
Choose Automations and then click + Add Automation or select an existing automation to edit.
Choose your trigger:
Select your trigger and configure the specific sensor state you want to monitor
Add a Webhook Action:
In the automation editor, scroll down to the Actions section.
Click on + Add Action.
Select Call Service as the action type.
Configure the Webhook:
In the Service field, enter rest_command.alarm_in_zuluhood
Set Up the REST Command:
Go to Configuration > Settings > YAML configuration or File Editor.
Add or update the REST command in your configuration.yaml file:
rest_command:alarm_in_zuluhood:url: "copy_your_zuluhood_webhook_url_here"method: post
Save and Reload:
Save your changes in the configuration.yaml file.
Reload Home Assistant configurations or restart Home Assistant to apply the new settings.
HomeKit - Setup Guide
Install Homebridge:
Follow the instructions on the Homebridge website to install Homebridge on a compatible device (e.g., Raspberry Pi, PC).
Install the Required Plugins:
Use the Homebridge plugin homebridge-http-webhook or homebridge-webhooks. Install it via npm:
Bash
Copy code
npm install -g homebridge-http-webhook
Configure Homebridge Plugin:
Open your Homebridge config.json file and add the webhook configuration. Here’s an example configuration:
{"platforms": [{"platform": "HTTP-Webhooks","webhooks": [{"name": " alarm_in_zuluhood ","url": " copy_your_zuluhood_webhook_url_here ","method": "POST" // or GET, PUT, etc., depending on your needs}]}]Add Homebridge to HomeKit:
Open the Home app on your iOS device, and add Homebridge as a new accessory. Follow the pairing instructions provided by Homebridge.
Create a HomeKit Automation:
Open Home App: Go to the Home app on your iOS device.
Create Automation: Tap on the + icon to create a new automation.
Add Trigger: Set up the trigger for your automation (e.g., when a certain device state changes).
Add Action: Choose the Homebridge accessory corresponding to your webhook action.
Save Automation: Review and save your automation.
Homey - Setup Guide
To set up a webhook in Homey, you can use either the Logic app or the Webhook app available in the Homey app.
If you use Webhook app:
. Install the Webhook App
If not already installed, go to the Homey App Store and install the Webhook app.
Create a Flow:
Add Trigger: Choose your flow trigger.
Add Action: Tap Add Action, then choose the Webhook action type.
Configure Webhook: Enter the webhook URL and select HTTP method (POST)
Save Flow: Review and save your flow.
Setup Instructions for Webhook in Logic:
Install the Logic App
Ensure the Logic app is installed from the Homey App Store.
Create a Flow:
Add Trigger: Set up your desired trigger.
Add Logic Action: Use the Logic app to create an action that includes the HTTP request.
Configure HTTP Request: Enter the webhook URL and select HTTP method (POST)
Save Flow: Review and save your flow
Hubitat - Setup Guide
Access Hubitat Dashboard
Log In: Sign in to your Hubitat account through the web interface or app.
Create a New Rule or Automation
Navigate to Rules/Automations: Find the section where you can create or manage automations. This might be labeled as "Rules," "Automations," or "Scenes" depending on the version or interface of Hubitat.
Create New Rule: Click on the option to create a new rule or automation.
Set Up Trigger
Choose Trigger Event: Define what will trigger the rule. This could be a specific time, a sensor state change, a device action, etc.
Configure Trigger Details: Set the details for the trigger. For example, if the trigger is a motion sensor, specify the motion detection event that will start the rule.
Configure Webhook Action
Add Action: In the "Then" section of the rule, add a new action.
Select Webhook: Choose “Send HTTP Request” as an action type.
Enter Webhook Details:
URL: Copy your Zuluhood webhook URL here
Method: Select the HTTP method (POST).
Save and Test
UniFi Protect - Setup Guide
Open UniFi Protect and go to the Alarm Manager section.
Select an existing alarm or create a new one to open the Edit Alarms panel.
In the Edit Alarms panel, you can:
Set the alarm name.
Edit the trigger settings, including selecting the devices (cameras & sensors) that will trigger alarms and setting an optional schedule.
Scroll to the Action settings.
Add an action and select Webhook from the dropdown menu.
Choose Custom Webhook.
Enter the Webhook Services URL.
Click Save.